Dynamic Cascading Hierarchy
Hierarchies
Overview.
Zoom and filter.
Details on demand.
Shneiderman’s mantra. It’s great to have users see the big picture. And then drill into their area of choosing. One way Tableau has allowed this is the ability to create hierarchies. You can even have lower levels only show “All Values in Hierarchy” making it display data respective to what you’ve selected above.
The Issue
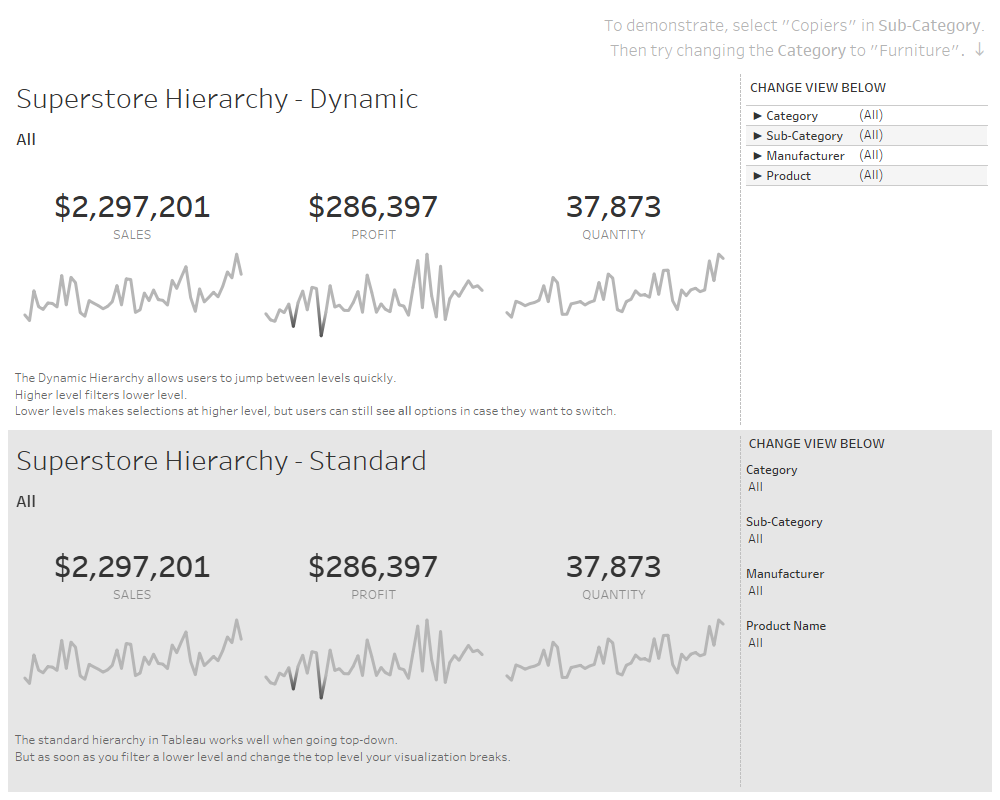
Upon selecting a value, it filters your sheet. Using Superstore, let’s say you choose “Copiers” in the Sub-Category filter. Works like a charm! However, there are two issues with this (first one is in my opinion).
It doesn’t show you what’s relevant in the Categories above. When selecting “Copiers” I’d expect it to tell me I’m looking at “Technology” in the Category filter.
Try changing the Category filter to “Furniture”. What happens? It breaks. Because there are no records where Category = “Furniture” and Sub-Category = “Copiers”. You have to clear your Sub-Category filter to resume your work.

Sub-Category becomes “(Copiers)” to inform you this is no longer applicable.
The Solution
Now, there has been a lot of great work done around hierarchies and drill-ins by many members of the community. Thanks in large part to Set Actions and, more recently, Parameter Actions. I’ve used the same approach here.
Part 1.
Generate your hierarchy. I did this in Tableau by dragging each item to the Rows shelf before exporting to Excel. This was to ensure I only had one row per Product.
Part 2.
Create an additional sheet which is the “All” sheet. You want your users to be able to have “All” as an option for each level. I’ve done Levels 2-5 here (could have done 1-4 instead). So, two columns: Level CD (2-5) and Value ("All”).
Part 3.
Return to Tableau. Union your hierarchy dataset as many times as needed (4) and then union your additional Level All sheet.

We have our dataset!
Part 4.
Create a Level CD value to identify each tier. I typically do this using the autogenerated Table Name field. To ensure we don’t overwrite our Level All table, add a check for that as well:
IF [Table Name]<>"Level All" THEN ZN(INT(RIGHT([Table Name],1)))+1 ELSE [Level CD All] End
You’ll want to add a Level DSC field as well. This will be the grain per each level. To deliver a similar look, I decided to make the All values display as “(All)” similar to Tableau’s default Hierarchy. (This could have been done prior to bringing in - live and learn!

Part 5.
Create your Parameters. One for every Level (default to “(All)” to be safe). And one for the Level CD - this will be used to drive the expansion of the hierarchy. I decided to set the “closed” value as -99. In order to toggle back and forth, create a Level CD - Expand value that will be used in Parameter Actions.


Part 6.
Begin create your view. Use Level CD to ensure you have your items in the correct order. Then create a Level Header field that alerts the user which level they’re on:

I also added Level DSC Order in order to ensure “(All)” appeared at the top instead of something that began with a number: IF [Table Name]="Level All" THEN 1 ELSE 2 END
Lastly, create a field with a unicode value to appear similar to a radio button based on what’s currently selected. This and the previously created Level DSC field will go in the Text pane.

Part 7.
You’re almost there! Create the values that will be passed to your parameters. This is the trickiest part. You want to make sure you only update the parameters when desired. This means you need to check the following:
When hierarchy is collapsed, do not update
When at a higher level, change lower level “(All)” if selection changes
Example: Category was “Technology”, changed to “Furniture”; update Sub-Category to “(All)”
When at current level, change to whatever is selected
When at lower level, only change higher level when lower level is more granular and there’s only one possible path
Example: with nothing selected, Manufacturer changed to “3D Systems”; update Category to “Technology” because that’s all that’s possible
Example 2: with nothing selected, Manufacturer changed to Belkin”; don’t update Category because it falls under both “Office Supplies” and “Technology”

Example for Level 3 (Sub-Category). Repeat this for each level.
Note: Level DSC - Current Selection just identifies the current selection per level.
Part 8.
Add to dashboard and add your Parameter Actions. One for the Level CD and one for each Level.

The Comparison
Click on the image below to open it up in Tableau Public!